How to reduce the printing cost while improving the quality of the print has always been a question for the printer. This article will combine the company's needs to analyze the process of color removal and communicate with colleagues.
The under color removal refers to a process method that appropriately reduces the amount of yellow, magenta, and cyan color inks in the neutral gray component of the three-color plate and replaces them with black ink. It is widely used in the multi-color wet and wet printing of modern high-speed printing presses. It is beneficial to the rapid drying of inks, while improving the quality of printed matter, saving color inks, and is conducive to maintaining a neutral gray balance.
Under color removal process principle
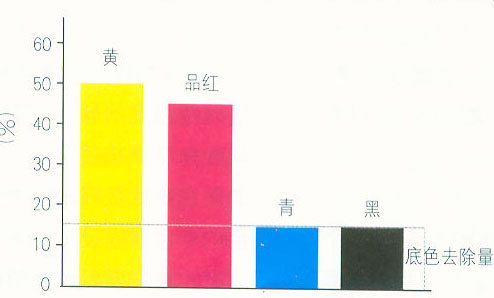
In theory, the ideal yellow, magenta, and cyan color inks can be mixed in equal amounts to form neutral gray. For example, 50% of yellow, 45% of magenta, and 15% of green overprinted colors have a neutral gray component of 15%. That is to say, the composite colors of the ideal three-primary inks can be added to the corresponding colors in the three primary colors. The composite color composed of ink and black-color ink is replaced to achieve the same visual effect. After applying the base color removal process in the above example, 35% yellow, 30% magenta, and 15% black can be used instead. The under color removal process is more and more widely used using this principle.
The purpose of background removal
(1) Reduce costs and increase economic efficiency
As we all know, the prices of yellow and magenta used in printing are different. For the ink of the same brand, the price of tricolor ink is much higher than that of black ink. With the background color removal process, black ink replaces some of the three primary color inks, thereby saving color, ink, and directly reducing costs for large-volume printing.
(2) Improve printability and shorten ink drying time
For a multi-color high-speed printer, each print has only a short time from printing to delivery, which requires the ink layer to dry quickly. Too thick ink layer will delay drying, and the printing product will cause troubles such as back rubbing during stacking. After the background color removal process is adopted, the amount of superimposed ink in the dark portion of the image is reduced and the ink layer is thinned, thereby shortening the drying time of the ink, increasing the printing speed, and reducing the amount of powder sprayed. On the other hand, modern offset printing is high-speed wet compression printing, printing ink volume is large, the ink is not easy to transfer completely, resulting in print ink uneven, partial density is not enough, color is not accurate, the use of background color removal process can make up for the above deficiencies.
(3) Help neutral gray balance and improve print quality
Neutral gray balance reproduction is the main objective technical standard to measure the overall hue of the print screen and evaluate the color reproduction, and it is also a prerequisite for whether the print copy can accurately reproduce the manuscript. Therefore, it is of great significance to maintain the stability of gray balance. Traditional printing uses yellow, magenta, and blue primary colors to superimpose neutral ash, but due to color shift of the ink and unstable factors in the printing, partial color cast may occur. The use of the background color removal process replaces yellow, magenta, and blue neutral ash with appropriate black ink to compensate for local color casts, under color defects, etc., effectively ensuring the stability of the neutral gray balance.
How to apply the under color removal process
The essence of background color removal is to reduce the amount of three primary color inks by adjusting the tone curve of each color version and replacing the three primary color inks with black ink in prepress production. However, it is not possible to increase the amount of black ink to substitute for the neutral ash that is superimposed by the three primary colors in order to pursue economic benefits, and this does not achieve the desired effect. The amount of substitution should be moderate, and its calculation method is as follows:
R (%) = S - (L - S) / KX 100% where: daily - the amount of color removal; L - the maximum amount of ink in the three primary colors; S - the minimum amount of ink in the primary color version; K a constant of proportionality, is 1 .0-1.5.
(The author / Li Chao, Xinhua Daily, Printing Corp.)
Source: Print Technology 2005, 10 (Publishing and Commercial Printing)
Diamond Painting, also known as Diy Diamond Painting, is an organic combination of exquisite and shining artificial crystal flat-bottomed round diamonds (some square diamonds) and well-designed patterns. Paste it on the corresponding color point on the canvas, thus completing the paste of a diamond, you can get started in a few minutes, and then slowly fill in each color area, a 40CM*40CM diamond painting only takes 2 hours It's done in about a minute. With the continuous development of diamond painting, it has now extended to innovative products such as 3D diamond painting and 5D diamond painting.
Diamond Painting,5d Diamond Painting,Diy Diamond Painting
Dongguan Junkai Packaging Products Co., Ltd , https://www.diystoragecase.com